Introduction
UniFly is a cross simulator multiplayer platform allowing you and your friends to see one another from different flight sims. Fly group flights, bush missions, landing tournaments and more with your friends.
- Live map shows currently connected UniFly traffic on an interactive world map
- Discord to join our community, get update notifications and receive help from our staff
Supported Simulators
Simulators:
- MSFS 2024
- MSFS 2020
- XPlane 12
- XPlane 11
- P3Dv6
- P3Dv5
- P3Dv4
- FSX
Air Traffic Control clients:
- EuroScope
- VRC
Development & Funding
UniFly's costs are entirely funded by donators and our own staff team. If you'd like to become one of our appreciated donators, please join our discord for a full rundown on our operating costs.
UniFly's development is fronted by a voluntary team working to serve the community and their passion. Whilst UniFly is a closed source project, we're always looking to bring on new developers to the team.
Need assistance?
Our voluntary team is happy to assist you in using the software, taking feature requests and bug reports. We operate on the Discord platform, you can create an account and join in the conversation with this link.
Download the installer
First, download the installer from our website. After downloading it, run it and follow the on-screen prompts. After it has finished, UniFly will have been installed and will automatically be updated every time you run it.
Setting up the Client
After running the client for the first time you will need to enter settings in order to setup some information about you.
- You will be required to set a 'nickname' which will be your display name to other clients on the network.
- You can optionally choose to connect to your simbrief by entering your simbrief username. This will allow you to quickly import a flightplan from Simbrief.
- UniFly will have automatically attempted to detect the filepaths of any installed flight simulators on your computer. Manually add in any that it has missed.
- When you're ready, enter in the details of your flight and hit connect. When both Network & Simulator are showing green
Connected, you're good to go
Installing Modelmatching
In order for UniFly to accurately show other aircraft in your simulator, you'll need to have installed a modelset of various aircraft and livery combinations. UniFly doesn't provide these, but does integrate with third party providers:
- For MSFS 2020/2024, we recommend installing FSLTL models.
- For XPlane simulators, we recommend installing Bluebell models.
- For FSX/P3D, we recommend FLAi models.
If you wish to use a modelset that hasn't been mentioned here, you'll need to provide your own ruleset file following vPilot's specified .vmr file format inside the %localappdata%/UniFly/rulesets directory
(MSFS Only!) FSLTL Models
These can be easily installed through the FlyByWire launcher.
Note that you only need to install the
Base Modelspackage, and not their additionalInjectorsoftware which uses the modelset for AI traffic.
(X-Plane Only!) Bluebell Models
Before installing a CSL model library, you'll need to install the UniFly-XPLM plugin. See below for instructions.
The models need to be installed inside of X-Plane 11/Resources/plugins/UniFly-XPLM/Resources/CSL.
Note that this installation is identical to that of the
xPilotsoftware, if you're familiar with that.
Lots of X-Plane plugins require a CSL model library installation. To avoid duplicating the same models in several different plugins' folders, you can set up a symbolic folder link from UniFly's CSL folder to that of another addon's. On Windows you can set this up by running a command like this one in Command Prompt. You'll need to change this command with the correct directory for X-Plane on your system.
mklink /d "D:\X-Plane 12\Resources\plugins\UniFly-XPLM\Resources\CSL\ivao-link" "D:\X-Plane 12\Resources\plugins\IVAO_CSL\CSL"
Installing the UniFly-XPLM plugin
The XPlane plugin allows the UniFly client to communicate with the XPlane simulator.
It should be installed from our website into the X-Plane 11/Resources/plugins/ folder.
This part of the software does not automatically update. If you're having trouble using UniFly with XPlane, it's a good idea to check that your plugin is up-to-date.
Time & Weather Settings
UniFly needs to correct for differences in terrain elevation and atmospheric simulation between different simulators. Some simulators have a more advanced atmospheric simulation affecting altimeter readings, and frequently two simulators will not have similar terrain maps for airports.
Therefore UniFly relies on all pilots flying on real world weather and real world time in order to correctly show aircraft at sensible altitudes and elevations, which is particularly important when connected on the ground. If you're seeing parked aircraft floating or sinking into the ground, the first thing to check should be your time and weather settings.
Rex WeatherForce
Rex WeatherForce is known to confuse UniFly's altitude readings. It has been reported that it helps to enable Real-Time Weather Injection under Rex's Weather Engine Settings.
ATC Adapter
The UniFly Client can be connected to the EuroScope and VRC Air Traffic Control clients aswell as flight simulators.
Setting up EuroScope from scratch
Install EuroScope
First, install EuroScope from the official website. Follow through the installer.
Downloading sector files
You must download sector files to tell EuroScope the up to date layout of airspaces and airports for which you want to control. See EuroScope's own documentation for further details.
You can find sector files for most airspaces on the AeroNav website.
When you open EuroScope, it will prompt you to select the sector file profile for the airspace you want to control. Simply select the .prf file for the airspace you just downloaded, and you should be good to go.
Now that EuroScope is setup, see the next page for a guide on how to connect EuroScope to UniFly.
Connecting as ATC
UniFly ATC provides an adapter between our network and popular Air Traffic Control software EuroScope and VRC. This guide demonstrates how to connect UniFly to these software.
The adapter works by creating a local network server for EuroScope and VRC to listen in to. We will configure EuroScope / VRC to listen into this local network rather than the VATSIM network.
We do not offer assistance with the installation and setup of sector files within your chosen ATC client. Please consult your ATC client's own documentation for this.
Setting up for VRC
To setup the UniFly server in VRC, follow these steps:
- Inside of
Documents/VRCyou will find a file namedmyservers.txt. (If this file does not already exist, create a new one with the same name) - Open it up with Notepad. On a new line at the bottom write
127.0.0.1 UniFly
Now, whenever you want to connect, follow these steps:
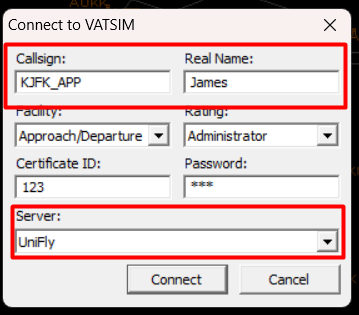
- Start VRC and navigate to
File -> Connect. Populate the window as normal with your callsign and name. - You must fill the certificate ID and password inputs with random numbers. If you leave them empty it will not allow you to connect
- At the bottom, select UniFly for the server. Do not connect to Vatsim. If you don't see UniFly as an option, go back to the setup stage.
- Now, inside the UniFly Client press connect. It will detect that VRC is open and start up the adapter server on your local network. You must connect on the UniFly Client BEFORE you connect on VRC
- Now, go back to VRC and Connect
Setting up for EuroScope
- Make sure EuroScope is already open, but not yet connected.
- Make sure
Show Simulated Trafficis disabled in Euroscope under theQuick SETmenu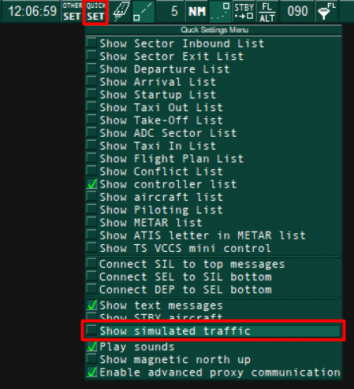
- Start the UniFly app and press Connect on the UniFly App. You won't need to fill in a flightplan with UniFly in order to connect as Air Traffic Control. UniFly should detect that it's connecting to EuroScope and start up the adapter on your local network.
- Now we can open the Connection dialogue on EuroScope in the top left corner.
- Set
Select connection modetoDirect to Vatsim(Don't worry, we're not actually connecting to Vatsim) - Set
Serverto127.0.0.1. (Although this field looks like a dropdown box, it will allow you to type into it.) - Beneath
Server, untick theConnect to VATSIMcheckbox - You must fill the certificate ID and password inputs with random numbers. If you leave them empty it will not allow you to connect.
- Fill in the remaining details: Callsign, facility, rating, real name.
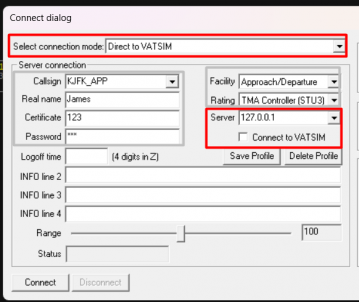
If you ever disconncet EuroScope from UniFly and reconnect it, then EuroScope will helpfully try to remember all of the aircraft from the previous connection. This means that if you change the UniFly server you're connecting to and reconnect EuroScope, then EuroScope might still remember pilots on the server you started with. To get around this you can fully shutdown and re-open EuroScope.
Caveats
- Flightplans are inserted into the ATC client's every 20 seconds. This unfortunately means that any modifications you make to a pilots flightplan inside the ATC software will be overwritten every 20 seconds.
- UniFly does not yet support Squawk codes